Deborah R. Fowler
Houdini Complex Scene Tips
Posted July 21 2018
Updated Mar 9 2024
(These are guidelines, and ultimately like many things in Houdini there may be several right answers and often “it all depends”). Although our hardware keeps improving and we are capable of displaying millions of sphere as opposed to say 200 in the early Silicon Graphics Workstation days, demands will catch up to the hardware and you will find this tips handy as software and hardware plays a lifetime game of leapfrog.
- DISPLAY ONLY WHAT YOU NEED
Working in a complex scene may require you not to see all the geometry that you are creating. You may even be using “instancing” to delay the geometry until render time (now available via packed geometry) to
further optimize rendering. Use PACKED GEOMETRY.
If you are working on a shader, don’t work with all the objects displayed, turn on only the object you are working on, you can also easily copy that element into another file to work on it unconstrained.
If you are working on layout or lighting, you can use prototypes using Houdini’s switch
node to easily have the first frame for quick previewing and subsequent frames for rendering. Houdini also offers many display options on the top level container node.
Take advantage of the render only and display flags combined with the null node. You can force objects on or off in your mantra nodes.
In addition, if you don’t need to display it in shaded mode, use wireframe, your interactions with the software display will be faster.
- CULL YOUR GEOMETRY based on camera - this can save you vast amounts of render time and is quick and easy to implement (cullGeoByCamFrustrum.hipnc)
- For one example where I have used it: PopGrainsSprinkles.html
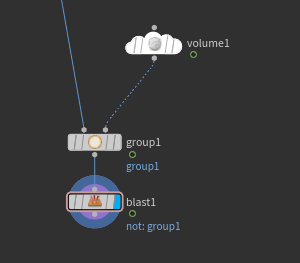
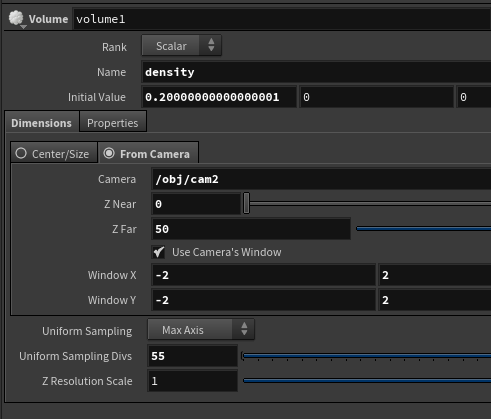
You can also use vex. Instead of creating volumes, you can use vex code to cull https://www.youtube.com/watch?v=s1x0qiJrLO8
I saw this and tested it in my Looooong Automaton and it worked great!
- RENDER SMALL RESOLUTION FOR TESTS
Unless you are working on texturing/shadow/sampling parameters, render small tests for
quicker feedback. You shouldn’t be waiting long periods of time to test lighting/shading
changes – there is no need to render the entire scene huge. Work smart == work fast.
- OPTIMIZE YOUR TEXTURES
Mari and substance often produce large textures (4K) that are not necessary for a given purpose. Think about how large your object will be on the screen and size accordingly. Often less than 1K (512 or even 256) is sufficient unless it is in your face on the screen.
Size of your textures can cost in terms of space on the farm as well as access time.
Houdini’s mantra renderer works most efficiently with RAT files. It takes but a few seconds to bring your tif, jpeg etc. source file into mplay and save it as a rat file.
Most importantly, make sure the size is reasonable and appropriate. Large files being accessed for displacement, color and so on are going to take time, so make sure these files are not huge, particularly when you have multiple items using these files. (Start with 512 or smaller, size up only if artifacts appear and it is necessary). Again, use your judgment to work smart.
(mplay is analogous to Maya’s fcheck but has different features).
- Select the renderer that is optimal for your scene, split up your scene if necessary
It can be helpful to split up your scene into render layers, and if you so desire, render passes. These are different beasts. You can have render passes of render layers. Layers are when you split geometry, for example foreground(fg), midground(mg), background(bg) - being careful to take into account relationships between them. This can save a huge amount of render time, particularly for held elements that need only be rendered for one frame.
Render passes are about splitting up the lighting layers for more control in compositing.
These are both excellent things to do and are utilized by studios, but come at a pipeline cost of possible errors and overhead.
Different layers may be using different rendering/shading algorithms.
If using REDSHIFT, similar settings can be found in the rop node for objects to do passes and AOV to do layers (see overview section on Redshift)
- ASIDE: Brief rundown of the rendering options in the Mantra node:
For 99.99999999% of what you do, you should use Physically Based Rendering. It may look as though there are many choices, however they are really a mix and match of rendering and shading algorithms.
PBR uses raytracing and physically based shaders
Micropolygon Rendering: - equivalent to old renderman’s reyes algorithm and was used for
- Scenes with huge amounts of complex geometry that cannot be raytraced efficiently
- Scenes with lots of motion blur or depth of field – computationally expensive shading happens once and is sampled in space/time
- Scenes with lots of semi-transparent elements (volumes, sprites, points) – this sort of layering historically was slow to raytrace
- Scenes with displacements (each primitive diced up into
micropolygons which are shaded and sampled independently)
- PBR uses raytracing, but select the PBR rather than Raytracing option for physically based shading as well
- Scenes with reasonable levels of complexity – as complexity increases scenes become exponentially (give or take) slower
- Scenes that require raytraced shading effects (such as reflections, refractions)
- Scenes that require very sharp details in shading –
micropolygon rendering tends to introduce softness by nature
of the underlying algorithm (sampling by sending rays from the
camera. Each surface hit by a ray will trigger a surface
shader execution.)
- designed for scenes with lots of motion blur (sampling by
micropolygons, shading and illumination physically based).
- sampling using raytracing and shading using physically based.